
Bit-by-bit Manual for Shaping Your Face
Molding has become one of the most famous cosmetics procedures throughout the last ten years. It permits you to shape your face and upgrade your highlights in a manner that is imaginative as well as extraordinary. While it might look mind-boggling, forming can be separated into straightforward advances that anybody can follow. This guide will take you through the whole course of molding your face, from picking the right items to mixing everything flawlessly for a characteristic, etched look.
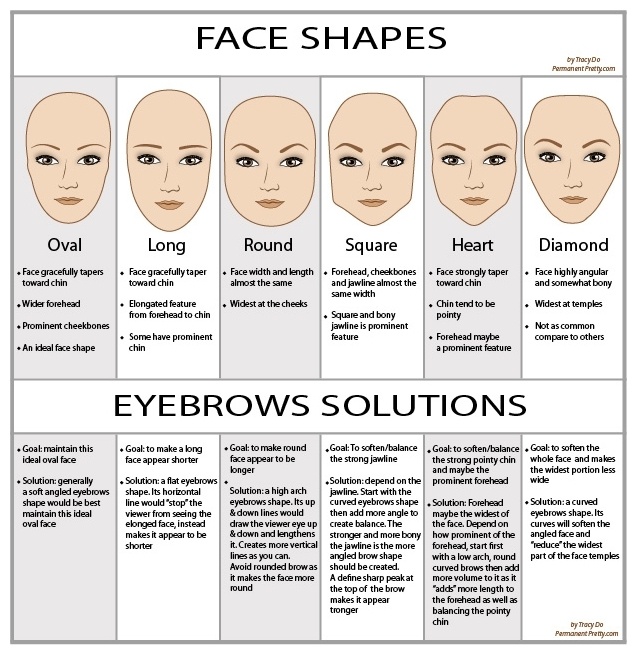
What is Shaping?
Forming is the cosmetics procedure of utilizing shadows and features to characterize and reshape the face. It includes utilizing hazier shades to make shadows that subside, while lighter shades feature regions of your desired face to present. The impact can assist with stressing bone construction, similar to the cheekbones and facial structure, while mellowing highlights like the nose or brow.
While shaping might sound confounded from the start, when you comprehend the nuts and bolts, it turns out to be a lot more straightforward. This guide will separate each step with the goal that you can certainly shape your face to accomplish a staggering look.
Stage 1: Prep Your Skin
Prior to jumping into forming, it's fundamental to start with a perfect, very much saturated face. Skincare assumes a critical role in how cosmetics will be applied and worn over the course of the day. Follow these moves toward preparing your skin for the molding system:
Purify your face with a delicate cleaning agent to eliminate any soil or oils.
Shed if important to guarantee a smooth material for cosmetics.
Apply a lotion appropriate for your skin type to keep your skin hydrated. A hydrating cream will likewise assist your cosmetics with remaining set up longer.
Prime your skin with a cosmetics preliminary. A decent preliminary will make a smooth base and assist your shaping items with mixing flawlessly.
Stage 2: Pick Your Items
There are a few items you can use to shape your face. These incorporate cream shape, powder form, or a blend of both. Here is a once-over of each:
Cream Shape: Cream items are perfect for a more dewy, regular completion. They will quite often mix into the skin and make a consistent, skin-like appearance. These are great for those with dry or typical skin types.
Powder Shape: Powder shape items function admirably for those with sleek skin. They're much of the time all the more enduring and can help moisturize the skin while characterizing the face.
Fluid Shape: Fluid Shape items offer a lightweight recipe that can be developed to accomplish the ideal power.
Highlighter: For the featured part of molding, you'll require an item that is a few shades lighter than your complexion. You can utilize a highlighter stick, fluid highlighter, or powder highlighter, contingent upon your inclination.
Become flushed: A blush can add a pop of variety to your cheeks, improving the etched impact.
Stage 3: Apply Establishment
The establishment frames the foundation of your cosmetics look, and it's fundamental for molding since it makes an even material. Follow these means for applying for establishment:
Select the right shade of establishment that matches your complexion perfectly. An establishment that is too light or too dull can impede the molding system.
Apply establishment to your face utilizing a cosmetics wipe, establishment brush, or your fingers. Begin from the focal point of your face and work outward. Make a point to mix a way into your neck to stay away from any cruel lines.
Let your establishment with a free or squeezed setting powder. This step will secure the establishment and give you a matte finish to work with, particularly in the event that you are utilizing cream or fluid forms.
Stage 4: Apply Form
The actual form adds aspect and construction to your face. This is the way you can apply shape to various regions of your face:
1. Forming the Cheeks
Utilize a form item that is 1-2 shades darker than your regular complexion.
Suck in your cheeks to track down the hollows. These are the regions that will make the deception of additional etched cheekbones.
With a calculated shape brush, apply the item straightforwardly into the empty regions, beginning from your ear and mixing lower toward the edge of your mouth. Make a point to mix well so there are no unforgiving lines.
2. Shaping the Facial structure
Apply form along your facial structure to make a more characterized and etched appearance. For a delicate look, mix the shape descending along your neck to stay away from any sharp lines.
To make your facial structure seem more keen, you can add shape straightforwardly under your jawline.
3. Shaping the Brow
If you have any desire to diminish the size of your brow or cause it to seem more modest, apply shape along your hairline.
Utilize a delicate hand to mix the shape into your sanctuaries. The objective here isn't to make a brutal line but instead to give the brow a more adjusted appearance.
4. Shaping the Nose
For nose shaping, utilize a shape stick or powder that is like the shade you utilized for your cheeks. This part requires a light hand.
Define two flimsy boundaries down the sides of your nose to make the deception of a slimmer nose. You can interface these lines at the tip of your nose to abbreviate the appearance, assuming that is your objective.
Mix the shape cautiously to ensure there are no brutal lines.
5. Molding the Sanctuaries and Cheekbones
To characterize the sanctuaries, apply form simply over the hollows of your cheeks, mixing once more into the hairline.
This adds profundity to your face and can make your cheekbones stand apart more. It's particularly viable for individuals with rounder counts who need to make a more precise look.
Stage 5: Feature
Featuring is something contrary to forming: where shape makes shadows to make regions retreat, featuring presents the regions you need to highlight. This is the way to apply highlighter:
Apply highlighter to the high places of your face: the highest point of your cheekbones, down the extension of your nose, the focal point of your brow, and your jawline.
Utilize a lighting-up concealer or fluid highlighter for regions that need more enlightenment, as under the eyes. This will cause your eyes to show up more alert and new.
Mix the highlighter into your skin so it doesn't look excessively unmistakable or glossy.
The objective is to make a brilliant, shining impact that differs with the molding shadows. Try to mix it well for smooth progress between your feature and shape.
Stage 6: Mix, Mix, Mix
Mixing is the most vital stage in the shaping system. Without legitimate mixing, your form can look unforgiving and unnatural. Here are some mixing tips:
Utilize a moist cosmetics wipe: A sodden wipe is perfect for mixing, as it assists with diffusing items into the skin for a characteristic, digitally embellished finish.
Utilize roundabout movements to mix shape into your skin, and consistently mix upwards to try not to drag the item down your face.
Mix shape lines into one another: the form along your facial structure ought to mix into the neck, and the form on your temple ought to mix into your hairline.
Utilize a light hand while mixing highlighter: Highlighter ought to remain more focused on the high marks of your face, so be mindful so as not to mix it a lot into the form.
Really look at in regular light: In the wake of mixing, investigate regular light to ensure there are no apparent lines or fixes.
Stage 7: Set Your Shape
To guarantee that your shape endures the entire day, setting your makeup is significant.
Utilize a setting powder: Daintily dust a clear setting powder over your face to secure everything. This will assist with keeping your cosmetics from softening or becoming gleaming.
Utilize a setting shower: A cosmetics setting splash will watch out for your cosmetics, even in hot or muggy circumstances. Just splash a light fog over your face after you've completed the process of forming.
Stage 8: Add Final details
Now that your shape and features are set up, you can polish off your look with the accompanying:
Become flushed: Apply blush to the apples of your cheeks to add a characteristic flush of variety. Pick a blush concealer that supplements your shape and features.
Eyebrows and Eyes: Shape your temples and apply eyeshadow as wanted.
Lips: Complete your cosmetics look with your favored lip tone.
Stage 9: Survey and Change
Whenever you've applied everything, make a stride back and really take a look at your face in various lighting. Change any regions that might require somewhat serious mixing or final details.
Last Tips for Effective Shaping:
Begin with a light hand: It's simpler to develop shape and feature than it is to eliminate overabundance items.
Pick the right shape concealers: Decide on concealers that are a couple of tones darker than your regular complexion for the most sensible look.
Careful discipline brings about promising results: Don't get deterred on the off chance that a chunk of time must pass to get the method on the money. Practice will assist you with refining your abilities and comprehending what turns out best for your face shape.
Make a point to mix: Mixing is vital to making shaping look consistent and normal.

End
Forming is a strong method that can help characterize and improve your highlights; however, it doesn't need to scare. By following these means, you'll have the option to shape your face like a master. Keep in mind that the way to fruitful molding is to understand your face shape and track down the right items that work for you.
0 Comments